一、准备工作
1.注册github账号
2.安装git
3.安装node版本管理工具
wget -qO- https://raw.githubusercontent.com/creationix/nvm/v0.33.1/install.sh | bash
4.安装node.js
npm install v8.9.3
5.安装hexo框架工具
npm install hexo-cli -g
二、搭建博客
1.开启GitHub Pages服务
点击create repository之后,进入setting设置,找到GitHub Pages如下:
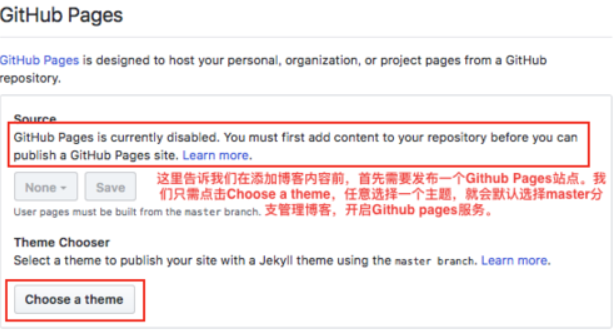
点击Choose a theme任意选择一个选择主题,然后界面会跳转到仓库,此时可以通过https://YourUserName.github.io,访问自己的博客网站了
2.创建本地博客站点
在任意目录下执行命令:
在博客根目录下输入如下命令:
2
hexo s //s是server的缩写,启动服务
此时,打开浏览器可以输入:localhost:4000,查看本地博客。
3.同步GitHub
修改本博客根目录下的_config.yml文件:1
2
3
4deploy:
type: git
repository: git@github.com:zhengkaii/MarkDownPhotos.git或https协议
branch: master
接着在控制台执行命令:1
2npm install hexo-deployer-git --save //安装部署插件
hexo d //部署到github
三、发布博客
输入如下命令:1
2
3hexo new "我的第一篇博客..."
hexo g //生成页面
hexo d //部署到远端
四、更换主题
进入博客根目录执行如下命令:1
2//安装next主题
git clone https://github.com/iissnan/hexo-theme-next themes/next
修改本博客根目录下_config.yml文件:1
2
3
4title: dimsky 的 9 维空间 //你博客的名字
author: dimsky //你的名字
language: zh-Hans //语言 中文
theme: next //刚刚安装的主题名称
主题配置./themes/next/_config.yml修改:参考主题配置
1 | scheme: Pisces //修改默认主题样式 |